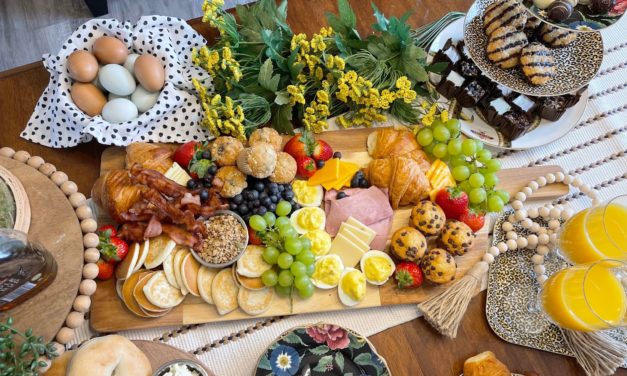
Living Well Spending Less | Saving Well, Spending Less | Project Simplify 365 | PrintHotCoupons.com

holidays

valentine’s day cake pops {DiY}

by Ruth on February 13, 2012

For the past few years I’ve made sugar cookies for Valentine’s Day and this year I really wanted to do something new.  Then I stumbled across Bakerella’s Cake Pop Book and discovered a whole new obsession.  I think if I could do nothing but make cake pops for the rest of my life, I would be a happy, happy girl.

They are SO fun to make!  The are pretty easy too, so if you are still looking for a fun treat to make with your kids for Valentine’s Day tomorrow, hurry on over to Jo-Anns or Michaels for some candy coating and lollipop sticks & get busy.

Supplies Needed:

1 box cake mix (we used pink!)
1 container ready-made frosting (also pink!)
small heart-shaped cookie cutter
wax paper
meltable candy coating (available at craft stores)
sprinkles or nonpareils (optional)
a block of styrofoam (Husband brought me home some from work)
lollipop sticks (available at craft stores)
small treat bags (available at craft stores)
ribbon
cardstock & stamps for tags (optional!)

I highly recommend buying the book–the instructions are very detailed and the ideas are awesome!  These hearts are definitely amateur level compared to the cool stuff she does in there.

Step 1: Bake a box cake in a 9×13″ pan according to the package directions.  Let cool completely.  Crumble the the cake into a large bowl, making sure to break down any large clumps so you don’t get lumpy hearts.  Mix in 3/4 of the can of frosting so that the crumbs stick together.  It should be similar to the consistency of Play-Doh.

Step 2:  Press a lump of the crumb mixture into the cookie cutter, then press out onto a wax-paper covered cookie sheet.  Repeat until all the mixture is used.  Refrigerate overnight or place in the freezer for 15-20 minutes until firm.

Step 3:  Melt the candy coating in the microwave according to package directions.  If it is too thick (mine was), add vegetable oil, 1 teaspoon at a time, until it reaches the desired consistency.  Dip the tops of the sticks into the coating, the stick into the bottom of the heart.  Let set for 5-10 minutes.

Step 4:  Pre-poke holes in your block of styrofoam.  Carefully dip hearts into melted candy until coated.

Step 5:  Place into pre-poked holes to dry.  If desired, you can dip half the heart into nonpareils, but let it set for a few minutes first or the coating will be too runny.

Step 6: After candy coating has hardened completely, cover heart with small treat bag and secure with a pretty ribbon and tag, if desired. (We used a Valentine’s stamp set we had from last year, but you could also print something or just write the tags by hand.)

Pin It Affiliate links may be used in this post. Printing a coupon or ordering a product through this link may result in a commission, which helps pay for the cost of running this site and keeps the content free. Read my full disclosure policy here.

{ 6 comments }

paper cone wreath {valentine’s day DiY}

by Ruth on February 6, 2012

 I stumbled across this gorgeous paper cone wreath a few months ago and have been wanting to make one of my own ever since.  Then, last month, when I was cleaning out my craft closet, I discovered several sheets of dual sided Valentine’s Day scrapbook paper (from last year’s projects), as well as a 12″ foam wreath form, and I figured the craft gods were sending me a message:  Valentine’s Day Paper Cone Wreath!

With no instructions to follow, I just made it up as I went along.  It wasn’t at all difficult but I’m not going to lie:  it was very time-consuming!  I probably spent at least 8-10 hours, spread out over several weeks, working on it, which is almost unheard of for me.  I’m more of a get-it-done-in-an-hour kind-of crafter most of the time!  But I love the way it turned out, so I’d say it was definitely worth the effort!

1.  The first step was punching out a whole bunch of scalloped circles using an extra large 2″ paper punch. I think a 3″ punch probably would’ve worked too, just made bigger cones, but a 2″ punch is what I had, so that is what I used.

 It takes a LOT of circles to fill a 12″ wreath!  I started with 9 pieces of 12×12″ scrapbook paper and I used every last piece.    I wouldn’t recommend cutting it quite that close!

2. Once you’ve punched out your circles, roll them into cones and attach the base of the cones to the foam wreath using straight pins.  It is better to use the pins that don’t have a colorful ball at the end, but I had to make do with what I had, so I hid the ball pins in the back rows and saved the small headed pins for the front.

3.  Once you’ve covered the front of the wreath with cones (have patience–it will take a while!), turn it over and glue some overlapping circles to the back to cover the remaining green.  This is optional, I just think it makes it look more finished.

4.  Hot glue a scrap piece of 1″ ribbon to the inside of the wreath, covering the bottoms of the first row of cones.

5.  Roll the remaining circles into cones, using a drop of hot glue to secure each one in place.

6.  Use these loose cones to fill in any “holes” in the wreath and to add extra depth by having them “stick up” a little further than the other cones.  Use the hot glue gun to hold them in place.

7.  Pin a small piece of ribbon to the back to use as a hanger

 8.  To make the flag, I just hand drew some letters then cut them out using an exacto knife.

9. I then cut out 4 small triangles out of scrapbook paper, glued the letters to the triangles, and glued the triangles to a short length of ribbon, which I then pinned in place.

The thing I love most about this project is that you can change it to match any decor or for any holiday–I’m already plotting one for my kitchen using this paper. ;-)

So what do you think?

Pin It Affiliate links may be used in this post. Printing a coupon or ordering a product through this link may result in a commission, which helps pay for the cost of running this site and keeps the content free. Read my full disclosure policy here.

{ 3 comments }

be my {frugal} valentine: 15 perfect valentine’s day gifts under $15

February 1, 2012

Valentine’s Day is right around the corner, which means it is time for the Annual LWSL Valentine’s Day Gift List!  I have found some awesome goodies for you this year–it is amazing what you can find for under $15 when you really start to look.  As with all gifts, of course, it is the thought [...]

Pin It
3 comments Read the full article →

handmade holiday gifts: potted paperwhite bulb {group gift}

December 16, 2011

If you exchange homemade gifts with your extended family or group of friends, it can be sometimes hard to come up with something thoughtful and original,  yet simple and cost-effective.  This year we have been very blessed to be part of a wonderful small group at our church called the Homebuilders, and I wanted to [...]

Pin It
1 comment Read the full article →

handmade holiday gifts: freezer paper glitter stencil tote bags

December 2, 2011

If you’ve never done freezer paper stencils before then you are seriously missing out!   They are so fun and so easy, and always turn out so cute.  The possibilities are almost endless.  And when you add pretty sparkly glitter to an already-fun project you have crafting utopia, my friends! Kids love to tote things around [...]

5 comments Read the full article →

handmade holiday gifts: felt & button hair clips

November 26, 2011

I took a tiny break from all the Thanksgiving-Black Friday craziness this week to do another fun & easy little craft project.  These  adorable hair clips look complicated, but I swear they’re not!  I made 8 different clips in only about an hour. For the Roses: 1.   Cut a small circle out of felt (the [...]

6 comments Read the full article →

a new holiday tradition {the elf on the shelf}

November 21, 2011

As much as I love Thanksgiving, I gotta admit that I am counting the days until I can decorate our Christmas tree, start listening to carols, sip hot chocolate while watching It’s a Wonderful Life, & just soak up the joys of the holiday season.  I’ll admit it, I’m a total sap when it comes [...]

14 comments Read the full article →

handmade holiday gifts: faux silk pomander

November 18, 2011

I love DiY but the past month or two has been a little hectic.  There has been very little time for creativity and I hate that!  For me, the process of creating something beautiful has a life and energy all its own.  No matter how dark my day,  I can’t help but feel like I’ve [...]

5 comments Read the full article →

helpful tips: LWSL holiday planning guide {free printable}

November 2, 2011

The holidays are right around the corner!  I don’t know about you , but my feelings are mixed.  On the one hand, I truly love this time of year, but at the same time, I can’t help feel a little stressed.  There are so many expectations!  So many things to do!  So many things to [...]

8 comments Read the full article →

halloween DiY: bumblebee costume {part 2}

October 27, 2011

A few weeks ago I posted part one of this year’s bumblebee costume for the girls.  The pillowcase dress design turned out cute, but my little bees were sadly lacking in necessary bee accessories.  They needed wings and antennae!  I found some cute options at Gymboree, but even on sale, the total cost for 2 [...]

Pin It
12 comments Read the full article →
Follow Me on Pinterest