
Are you ready to sew some adorable PJ pants for your whole family? This step-by-step tutorial shows you how to make easy-to-sew pajama pants in any size.
One of our very favorite Christmas traditions is staying in our pajamas all day on Christmas Day–even right through Christmas dinner. While we don’t usually get new ones every year, it has been a few years since our last set, so I decided that this year, in the spirit of our handmade holiday, I would make matching pajama pants for everyone.
I have explained in previous sewing posts that I am really not a very technical sewer. My seams aren’t always perfectly lined up and I never bother pre-washing my fabric, and I finish my inside edges with a pinking shears rather than a serger. I usually shoot for function rather than perfection, and time-wise, that approach pays off. Each pair only took about an hour to make. If you are really nit-picky or have advanced sewing skills then this tutorial will probably make you crazy. Consider yourself warned! 🙂
Here is what you will need:
main fabric (about 1 yard for kids’ pants or 2 1/2 yards each for adult pants) contrasting fabric for cuffs (1/4 yard is plenty) thread elastic pinking shears & scissors sewing machine pins & safety pin pants or leggings to use as a pattern
STEP 1: Lay pants or leggings down on fabric to see how much fabric you will need. For the kids’ pants (shown) cut the fabric as shown, leaving a couple inches at the top and bottom. For the adult pants you will need TWICE the length of the pants.

STEP 2: For the kids pants, fold the fabric as shown, then fold once more so that it is in 4 layers. You will probably not be able to do this for the adult pants unless your fabric is very wide or your pants are very skinny, but for the kids pants it saves a lot of fabric. For the adult pants, fold your fabric lengthwise so that you have 4 layers as well.

STEP 3: Using your pants as a guide, cut fabric in shape of pants, being sure to leave several inches of extra fabric at the top, and widening the legs to make nice straight leg pajamas.

STEP 4: To make the contrasting cuffs, cut 4 rectangles of the contrasting fabric that are approximately 4-6 inches wide and as long as the bottom of the pajama pant leg.

STEP 5: Next place one cuff on bottom of one pant leg with right sides together, lining up bottom edges. Stitch together as shown.

STEP 6: Fold contrasting fabric down, then stitch in place; repeat these 2 steps for all 4 pant legs.

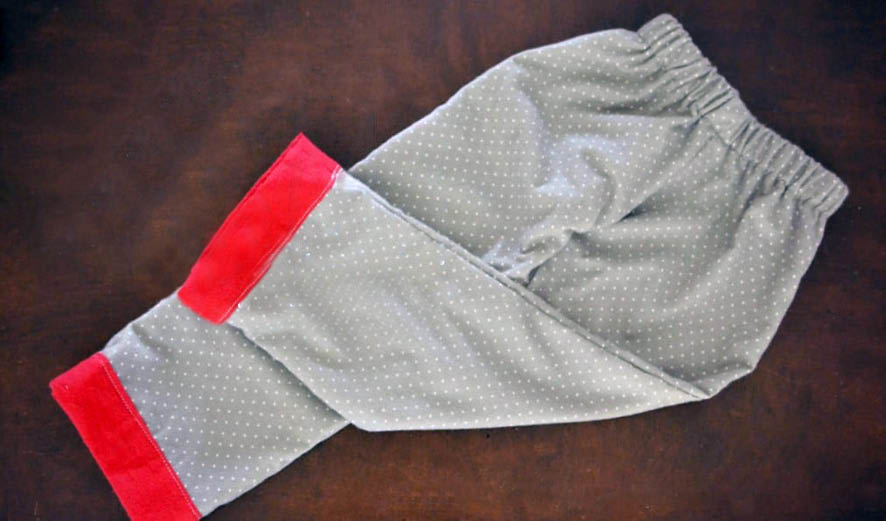
STEP 7: When you are done they should look like the picture above.

STEP 8: Next, pin 2 of the pieces with right sides together on the curved section as shown, from the top of waist to the crotch. Stitch together and remove pins. Repeat for second set of pieces.

STEP 9: Open up pieces as shown and pin together with right sides facing in, lining up cuffs as well as you can.

STEP 10: Once pinned together, stitch the inside seam, starting at the bottom of one leg and curving around the crotch, then finishing at the bottom of the other leg. You can reinforce the crotch with extra stitches, if desired. Next, stitch the outside seam on either side.

STEP 11: When you turn it right-side-out, it should now look like pants!

STEP 12: Fold the cuff over into the inside, then pin in place. I placed the pins on the outside so that I could see them while I sewed.

STEP 13: Stitch cuff in place by following existing stitch line. You could use a matching thread to your fabric so it doesn’t show; I just use white for everything because it is cheaper and easier!

STEP 14: Once your cuffs are done, fold the top of waist over just enough to finish the raw edges, then pin and stitch in place.

STEP 15: Fold waist again, this time about 1 1/2″, and pin in place. Mark pins at the stop and start line, as you will need to leave an opening for the elastic. Stitch closed, stitching along the bottom fold to leave room for the elastic.

STEP 16: Cut elastic to proper length, leaving a few inches allowance, then attach to a safety pin and guide elastic through waistband. Stitch 2 elastic ends together and then fix waist so that it is evenly gathered all around. Voila! You’re done!

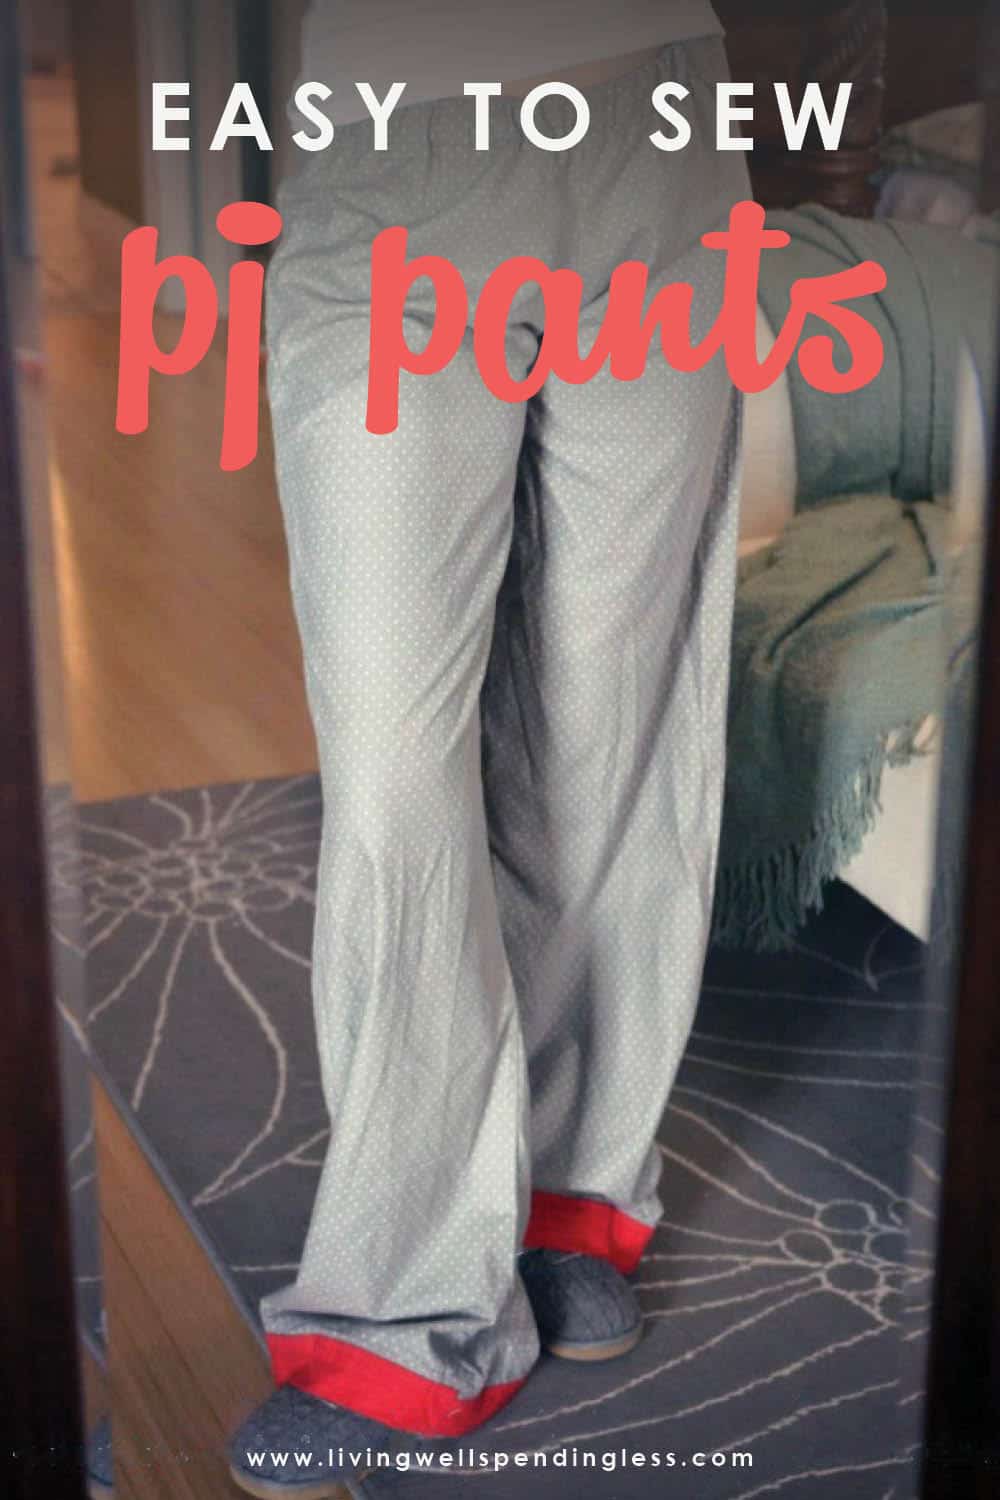
STEP 17: I couldn’t have the girls model them since they are a surprise for Christmas Eve, but I did try mine on and take a picture in the mirror. I purposely made mine extra big & long to be extra comfy, and I can’t WAIT to wear them!
Want more DIY tutorials? Here are some other projects we think you’ll love!
Pin for Later:

Ruth Soukup
Latest posts by Ruth Soukup (see all)
- Stop Worrying About Money - July 19
- How to Fit In More Fitness - April 28
- The Most Powerful Decision You’ll Ever Make - April 27
TAKE BACK CONTROL OF YOUR HOME LIFE
 Ever feel like you just can't keep up? Our Living Well Starter Guide will show you how to start streamlining your life in just 3 simple steps. It's a game changer--get it free for a limited time!
If you love this resource, be sure to check out our digital library of helpful tools and resources for cleaning faster, taking control of your budget, organizing your schedule, and getting food on the table easier than ever before.


ran across this tonight and was feeling like a project….turned out wonderful…. thank you so much 🙂
I’ve never made trousers before but chose this tutorial to follow to make a pair of pirate trousers for my 6 year old for a pirate party. So far so good, they’re half made! Plan to finish in the next couple of days. Tutorial is certainly easy to follow with plenty of clear pictures. Thank you 🙂
Hi there,
I’m hoping to make a set of these for the family. With a few of the other patterns I’ve run into there not being quite enough room through the bum. Have you had any problem with that? Thanks!
I’ve had problems before with cutting the fabric with too much on the sides and then having to hem them. Will I have this problem? I’m just so nervous because these will be for all the niece’s and nephew’s Christmas presents this year.
Just now I finished sewing a pajama pant for me. Your instructions are perfect for beginners like me. I have a nice sewing machine which I got for free. I always wanted to learn sewing, but never got the time and opportunity. Your tutorial has given me a good start. Thanks a lot. Please post more for beginners.